

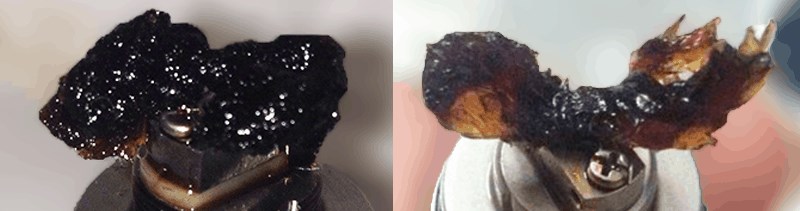
Coil gunk is an e-cigarette problem that many e-smokers know all too well. How many times have you experienced this scenario? You’ve been using your favorite sweet and creamy e-liquid non-stop for a few days, and you begin to notice a change in the flavor. You ignore it at first, but before long, it tastes like you’re getting dry hits even though your tank is full or your wick is yet. You look at your atomizer coil, and this is what you see:
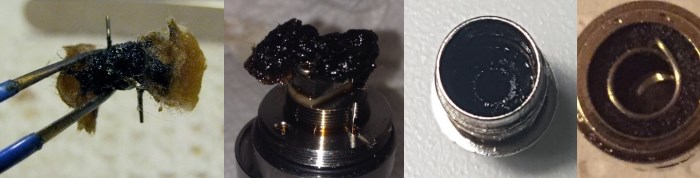
Pretty gross, right? There are quite a few factors that contribute to atomizer coil gunk. No atomizer coil lasts forever, but there are some conditions that contribute to rapid coil gunk buildup. The good news is that those conditions are, for the most part, completely avoidable — a good thing if you’re using a tank with pre-made coils and can’t afford to drop a new coil in your tank every day. Ready to learn more about coil gunk and decide on a plan of action? Read on!
What Is Coil Gunk?
Coil gunk is a dark crust that forms on an atomizer coil, eventually discoloring the wick as well. Eventually, the crust becomes so thick that you can taste it when you vape — most likely because the coil is actually burning some of the gunk off. After a while, coil gunk makes the experience of vaping so unpleasant that you have no choice but to replace or clean the coil.
Revolutionary New Disposable Vape
The new Lost Mary MT15000 lasts up to 15,000 puffs and features the incredible new Pulse Mode that allows you to get double the vapor on demand. A front display shows the device's e-liquid supply and battery life at a glance. Try the Lost Mary MT15000 Sample Pack, which includes three different flavors, for just $39.99. Take an additional 20% off with the coupon code VAPEGRL.
Quite simply, coil gunk is residue. It’s all of the stuff in your e-liquid that doesn’t vaporize cleanly — flavors, sweeteners and other components. Eventually, it claims every coil. Today, though, coil gunk accumulates more quickly than ever. For that, you can blame the sweet, rich e-liquids that many e-smokers prefer today. You can also blame the popularity of sub-ohm tanks and rebuildable atomizers (RBAs) that consume more e-liquid than ever.
If you have an e-liquid that tastes exactly like your favorite dessert — and it’s so sweet and irresistible that you can’t put it down — it probably causes coil gunk. I’ve had pre-built coils gunk up after less than a full day of use. At $2-3 per coil, that’s not a lot of fun. If coil gunk is getting you down, read on to learn about some of the most common causes. You can decide for yourself whether changing your vaping habits in an effort to reduce coil gunk would be worthwhile.
What Causes Coil Gunk?
Sweeteners
By far, sweeteners cause more coil gunk than anything else. The carbohydrates and sugars don’t fully vaporize; instead, they collect on the coil and eventually burn. If you want to avoid a gunked up coil, the absolute best thing that you can do is avoid any e-liquid with sweeteners.
Take a look at the video above, in which someone drops a red hot ball of nickel into a pan of sucralose (Splenda). You might think that a glowing ball of nickel and an atomizer coil have nothing in common with one another — until you watch the video and see that, when they pull the ball out, what’s on it looks an awful lot like coil gunk.
By far, sweeteners cause coil gunk more rapidly than anything else.
I’ve noticed that Black Note and Halo e-liquids, in particular, seem to cause far less gunk than a lot of products from other e-liquid companies. In Halo’s case, I believe it is because Halo e-liquids contain less sweeteners than other brands — and often no sweetener at all. Black Note is a very gunk-free e-liquid simply because the tobacco extracts are so well filtered and few additional ingredients are added to their e-liquids.
I know, I know. Sweet e-liquids are very tasty. I love my Mad Hatter e-liquid, too. I’m just saying that if you prefer really sweet e-liquids, you’re probably best off using a tank or atomizer that you can rebuild — or at least re-wick — because you’re going to get coil gunk really quickly.
High Wattage, Chain Vaping
Do you enjoy taking very long puffs when you vape — particularly at fairly high wattage settings? You might think that you have a problem with coil gunk, but the problem may actually be that you’re burning your wick. If you use cotton, for example, it’s important to bear in mind that cotton is exceptionally absorbent — but it doesn’t wick very well. In other words, liquid might not travel to the coil as quickly as the coil can vaporize it. Take enough long puffs consecutively, and your wick will at least partially dry out. You’ll burn your wick away, little by little.
If you have an RBA or RTA, It’s actually really easy to tell if you’re vaping too frequently and killing your wick. Simply access the coil and tug one side of the wick with a pair of tweezers. The wick will break easily, and you’ll see a big black spot in the portion of the wick that was directly under the center of the coil. Take a look at the picture below:
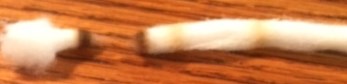
In this picture, you can plainly see that the cotton wick has split in the middle from burning.
If you’re using a tank system, it’s not so easy to tell whether you’re killing your wick. It’s probably safe to assume that you are, though, if you need to replace your coil every day. If you look inside your coil and see black after just a day of use, that’s another likely sign.
NET E-Liquids
I have experience with two types of Naturally Extracted Tobacco e-liquids — Black Note and everything else. Most of the time, an NET e-liquid has a very noticeable “ashtray” taste. That’s because all of the tiny tobacco solids in the extract weren’t filtered out. Those solids end up sticking to the coil and burning. Eventually, the burned tobacco solids form a crust of carbon on the coil. The coil gunk spreads and discolors the wick, and eventually you’ve got a foul tasting e-cigarette.
What can you do about a crusty coil caused by NET e-liquids? In my opinion, you should give Black Note a try. Black Note makes the only NET e-liquids I know of that don’t form coil gunk.
VG-Based E-Liquids
If you’ve done any reading online about coil gunk before coming here, you’ve probably seen someone claim that an e-liquid with a VG/PG ratio that heavily flavor vegetable glycerin will cause coil gunk more quickly than other e-liquid formulations. I haven’t seen that, myself. I actually have no reason to believe that vegetable glycerin causes coil gunk. However, it is true that VG doesn’t carry flavors as well as PG. For that reason, some vendors add extra flavor to their “Max VG” e-liquids. If you consume more flavoring agents, you’re going to get coil gunk more quickly.
Dark E-Liquids

Some people find that darker e-liquids cause coil gunk more quickly than clear e-liquids. I have no opinion on the matter because I find that dark e-liquids are almost always sweet — and it’s well known that sweet e-liquids cause coil gunk more quickly than anything else. I find that very sweet e-liquids gunk coils up at about the same rate regardless of their color. It could be, though, that the same compounds that make some e-liquids darker than others also collect on coils rather than vaporizing fully.
How to Fix Coil Gunk
Clean Your Coil
Most of the people reading this article probably use tank systems with pre-built atomizer coils. It is technically possible to re-wick and dry burn a pre-made coil, but doing so is often difficult. You really won’t get anything like the performance of a new coil unless you replace the gunky coil entirely. If your wick isn’t burned at all, though, you may be able to restore some of the lost performance by cleaning your coil.
To attempt cleaning your coil, I suggest swishing it in a strong grain alcohol — something that’s safe to drink. If you have a very small nylon brush, you could also try scrubbing the inside of the coil. Rinse the coil with very hot water, and leave it out to dry completely before priming it with e-liquid and attempting to use it again. Usually, the same conditions that cause coil gunk also ruin cotton wicks. So, although you can try cleaning your pre-built coils, you may have limited success. Still, it’s worth a try if gunk has ruined your last coil.
Switch to a Rebuildable Atomizer
If you deal with coil gunk constantly and don’t want to change your usual e-liquid, you should probably consider using a rebuildable atomizer. Pre-made coils for tank systems usually cost about $2-3 each. To a certain extent, coil gunk is simply a function of the amount of e-liquid you consume. So, if you’re replacing your coil every couple of days and going through 10-15 ml of e-liquid daily, you could easily end up paying more for vaping than you would for smoking.
Switch to a rebuildable atomizer, and you’ll cut your costs significantly. Instead of spending a few dollars for each new coil, you’ll spend a few cents. With a rebuildable atomizer, it’s also much easier to clean the coil and put in a new wick — which is really all that you need to do to get rid of coil gunk.
It’s finicky and sometimes frustrating, but I’ve really been enjoying the iJoy Tornado Nano recently.
Change Wick Material
If you’re constantly torching your wick by vaping at high wattage settings or not giving your coil a sufficient break between buffs, you may benefit from a switch to a different coil material. People love cotton because it’s cheap, it works fairly well as a wick and the flavor quality is high. One thing cotton isn’t good at, though, is staying intact at extremely high temperatures. You may have a better experience if you switch to a different wick material such as silica or ceramic, since both of those materials can handle high coil temperatures without burning.

Re-Wick and Clean
[yellow_box]Note: check the bottom of this article for information about re-wicking pre-built atomizer coils.[/yellow_box]
If you’ve never cleaned a gunky RBA or rebuildable tank atomizer (RTA) coil before, it’s really not so hard to do — but there are several ways to go about it. The first thing you’ll want to do is remove your wick, assuming that you’re using cotton. Whether it’s from the coil gunk or constant vaping, the wick is going to be scorched, discolored and unusable. So, you’ll need to remove it and throw it away. I like to disassemble my RBAs and RTAs fully and rinse them in the sink before I begin, since I don’t like getting e-liquid on my hands and re-wicking a coil is always a good excuse to give everything a good cleaning.
Use your fingers or a pair of tweezers to gently tug the wick out of the coil. Throw the wick away.
That’s the one aspect of cleaning a gunky coil that pretty much everyone agrees on. You need to get rid of the wick. The best way to clean a gunky coil is a subject of intense debate, though, so I’ll provide a few options and let you select one for yourself.
Dry Burn
Probably the most popular method of cleaning coil gunk is the dry burn. To dry burn your coil, simply pulse the fire button a few seconds at a time until the coil begins to glow red. During the dry burn, the coil burns away the gunk. You should be left with nothing but dark carbon on your coil after dry burning, and you can get rid that by rubbing the coil with a wet cotton swab, using a small brush or running some water over the coil. Once the coil is completely clean, you can add a new wick and continue vaping.
What are the downsides of dry burning a coil? For one, you are actually burning something. That’s going to create fumes, and you might inhale those fumes. Nobody actually knows what the implications of that are.
There’s also the possibility of a coil breaking and potentially causing a short if you heat it too much. I actually ruined a very nice regulated box mod that way. The coil popped, the mod made a sort of screeching sound, and then the screen turned off. Obviously, that was a potentially dangerous scenario. I learned that day that a dull red glow on the coil is perfectly sufficient when dry burning.
Lastly, you should know that some types of wire don’t really take well to dry burning. Titanium, nickel and nichrome all have potential issues associated with dry burning. Unless you use a Kanthal coil, I’d really suggest cleaning the coil in some other way.
Liquid Cleaning
You can actually do a lot to de-gunk your coils simply by using a bit of liquid. After removing the wick, unscrew the coils from their posts and drop them in some very hot water. After a bit of time, the coil gunk will start to fall off. If necessary, you can give it a bit of mechanical help with a brush or cotton swab.
You can often dunk the entire atomizer base — coils, build deck and all — in liquids without worrying if you don’t want to bother with reattaching the coils when you’re done. You might want to be careful, though, with metals such as copper that discolor easily.
Some people suggest using other liquids such as vodka, grain alcohol or Coca-Cola for cleaning coil gunk. It seems to me that an alcohol that’s safe to drink is acceptable as a coil cleaning solution. I use that method sometimes, myself. The Coca-Cola method supposedly works very well, thanks to the acids in the beverage. However, the same acids that eat away the gunk on your coil could potentially eat away at and degrade the coil itself. Doesn’t sound like a great idea to me.
Ultrasonic Cleaning
Do you have an ultrasonic jewelry cleaner? If you do, fill it with plain water and drop in your coils. The ultrasonic waves provide plenty of mechanical help for removing coil gunk, and you don’t need to worry about residues since it only requires water.
Clean All of the Coil Gunk
Whatever method you use, the most important thing is that you clean away all of the residue on a coil before using it again. Otherwise, the residue that’s left will burn, the wick will degrade almost immediately and you’ll need to start the cleaning process all over again.
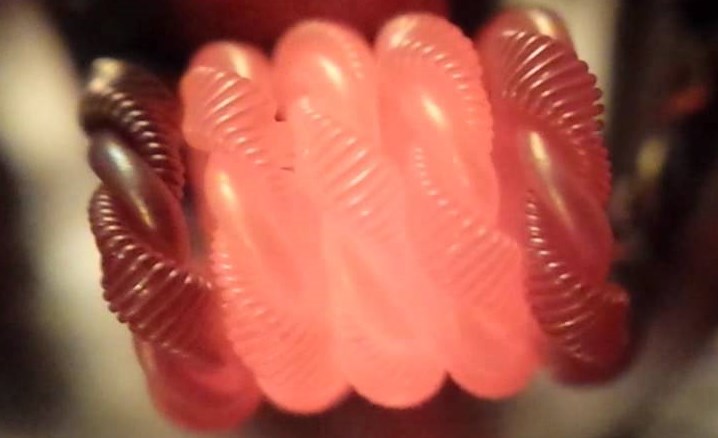
Re-Wicking Pre-Built Atomizers
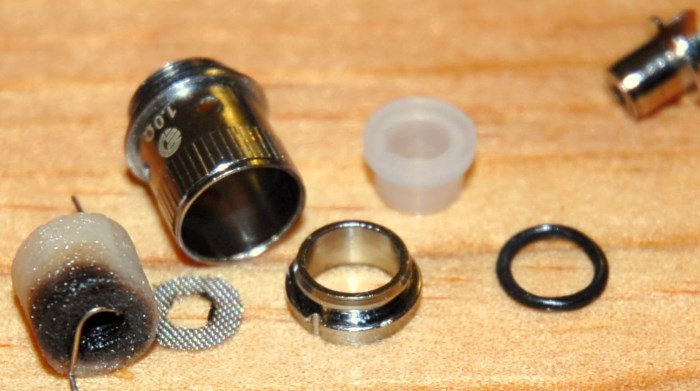
It is actually possible to re-wick a pre-built atomizer head, as evidenced by the picture above. Whether you can do it easily, though, depends on the atomizer’s design. With some atomizer heads, you can simply pull the pin and insulator off of the bottom and push the coil and wick through the top. Unwrap the wick from the coil, replace it with a new wick and reassemble the atomizer. Make certain that you return the coil’s positive and negative leads to their original positions. One is usually slightly longer than the other; that one goes between the pin and insulator. The shorter lead goes between the insulator and the body of the atomizer.


Great article! Thanks 🙂 Wish I had found it before I’d trolled a thousand forums (felt like it… 😉 )
I’m very glad that you enjoyed the article! Coil gunk is annoying, but it’s an ever-present reality for anyone who prefers sweet e-liquids and uses a device with high vapor output. I tried to write something that would be the most complete guide out there.
Great article. Here is my goto method. Step 1) remove the gunked coils and soak in hot water. 2) while they soak, I mix a little bit of baking soda and water to a watery consistency. 3) After at least 10 minutes I remove the coils from the hot water and drop them in the baking soda mix. 4) I use either the small wire brush from my gun cleaning kit or Q-tips and scrub the coils with the baking soda mix until shiny clean. 5) Finally rinse well and pat dry. Enjoy! The baking soda mix gets the coils shiny clean.
There’s a similar method I use to clean my Sterling jewelry. Removes every single last bit of tarninsh & gunk (lotion build up & the like). You take a glass bowl, line it with aluminum foil, put the jewelry on the foil, sprinkle a good dose of baking soda on top of the jelwery, then pour boiling water on top. I use my Keurig with filtered water. Let it sit until it quits fizzing. Then I use an old tooth brush to scrub. Then buff dry. Looks brand new every time. Might this work for coil gunk?
Should work, just be sure to rinse with clean water after you scrub it so you aren’t vaping baking soda. I would probably nix the foil as well, I highly doubt baking soda is strong enough to do it but there is a coating on there that could potentially contaminate your coil if were to dissolve.
Pretty sure my problem is that I’m burning my coil and not coil gunk. What do you recommend to fix that while still getting a satisfying vape? Even with 50/50 it’s burning. If I turn down the power I end up taking a long drag but if I shorten my drags I feel like I have to crank up the power.
Hi Justin,
Are you getting dry hits right away with brand new coils? If you are, the coil design probably doesn’t have the wick capacity to handle the longer puffs that you want to take. Maybe switch to a bigger tank with wider coils?
Maybe go for an RBA or something with a multi coil design. If you are already using an RBA a common mistake is using too much wick so it ends up packed to tight to wick quickly (lord knows I’ve done it.). Also in most cases setting your airflow higher helps build more negative pressure to aid in wicking.
An RBA should also alleviate the problem. I find that when I use any tank with small coil heads, the coils simply don’t have enough wicking material to sustain long puffs. You vaporize everything in the wick, and liquid doesn’t feed from the tank quickly enough to resaturate the cotton. Instant dry hit. A tank that uses wide coils with plenty of wicking material — or an RBA — should help.
New to vaping, 2 weeks and today clean of zero cigs! I’m scouring the net researching for answers to my multiple questions and issues that plague me.
Thank you for your post, quite informative! I was wondering about prebuilts… I’ve already begun soaking mine in PGA.
I think I am a flavor chaser. All juices mute on me on lower wattage devices along with non premium, must find solution without dealing with juice thirsty tanks… Maybe building my own will help.
So much to learn!!!
Jam ya splif! Man of goodness and honey.
Solution: get a ceramic wickless coil
Problem solved.
Great write up! Here’s my method: I build larger diameter 3.0 spaced kanthal coils. Clapton coils and similar actually gunk more because the guitar string-like design has ridges and pockets for more gunk to hide. Spaced coils with kanthal dry-burn more efficiently. First I pull the wick, then dry-burn at 20 watts to a dull glow then release and repeat once. You’ll know when you’ve dry burned enough when you see the fumes diminish. Then turn the mod upside down and dip the coil in vodka. It should make a quick hissing sound. Shake or blow off excess vodka, let dry for 30 seconds. Then one more short dry burn. This is similar to the Brusardo method but with vodka instead of water as water leaves mineral deposits. Works great for me.
I’ve had a lot of success by using a q-tip. Unravel the cotton on one end of the q-tip twist it until it’s small enough to fit inside the coil chamber and then twist the opposite way to force the cotton to expand inside the coil and you should be able to get most of the gunk out.
Or just replace the coil. That gunk tastes horrible
Except usually, the coil is just fine after a bit of dry burning – and I’ve yet to actually come across a case where it isn’t. If it isn’t, then you probably didn’t dry-burn off the coil enough and left some gunk still in/on there. Although wire is really cheap (especially if not Claptoning), so is a 3lb box of Rayon. If replacing the wire also, it will just be double the work of simply replacing the wick itself.
Also, to be extra-safe(r), people may want to do the dry-burn under an exhaust fan – so the nasty smelling (& likely carcinogenic) smoke won’t fill up your room.
Our house has great success with coil brushes that are designed to clean out the insides of pre-built coils. We get an extra month or two out of our coils that way vs just rinsing them out. There’s a company on eBay that has free coil brushes with their Koh Gen Do Japanese Cotton. Just search for “Koh Gen Do Cotton” on there and they always come up at the top (the one with the free gift). We clean and reuse our brushes (keep them in a baggie) so one brush will last a long time. Saves a TON of $ on new coils.
It was great . Thank you for yoyr helpful information. I’ve recently used RBA, but I’m still suffering from hurshing vape after 2 or 3 days that I realised coil gunk on my coils. Unfortuonatly the E-cigrrates and E-juice sellers in my country (Iran) dont have enough information about these kind of problems and just advised me to change the coils which were so costly to me. I hope use your method to get rid of paying more money for new coils.
I had a bad burnt taste that would burn to my throat while I was vaping. I use the Vaporfi Vox TC vaporizer. I cleaned out my atomizers with q-tips and alcohol (be careful not to unwind the coil with the q-tip – I screwed up one of the atomizers I cleaned). I discovered a lot of black gunk inside (YUCK!) and presto, fixed the problem! I haven’t been using the salt based liquids recently. Currently I’ve been vaping with the sweet Vapetasia Killer Kustard 0MG. I’ve been using my vape for an hour now and have had no issues with the taste. Thanks! I’ll keep this trick in mind if it happens again. I will note that my device also said short on it while I was having issues so I’m not sure if that was contributing to the burnt taste/throat feeling. However, cleaning it out did the trick.
Thanks heaps for this article. A 3day old vaper, I could not figure out why my e-liquid had lost its flavour, and gone sooty looking!! As a very newly ex pipe smoker, I couldn’t taste the burn (or see the obvious, I guess)- and it was only thanks to that section in your article that it occurred to me to take my (discarded) pre-built coil apart to see what had gone wrong (and I was freaking out that it might have been the n.e.t liquid I was using, and I’m in the middle of nowhere with supplies 2weeks postal wait away, and I really don’t want to have to go back to tobacco, even for a second so.. aaaaaarghhh!!!).
Luckily, the burnt cotton, when I found it, is a dead give away.. Now all I have to do is figure out what NOT to do!
Anyway, thanks again
So thanks,
Vandy vape triple 2 RTA. Love desert flavors so once a week I rewick. .8 dual coil at 40w-45w lower temps help to not scorch the sugars in the liquid. But as the person who posted this said. The reality is sugar+heat=gunk so take it easy on your coils.
Also I find that a lot of newer to intermediate vapers miss an extremely crucial step.
PRIME YOUR COILS WELL. A wet coil is a happy coil. Do it right and it’ll give you an extra day or 2 of coil life.