

Your vaping delight can quickly turn to disgust when your clearomizer becomes gunked up and dirty. You probably need to clean your clearomizer if you experience any of the following when vaping:
- Decreased vapor production
- Flavor ghosting, or the ability to taste hints of a past flavor even after you’ve added a new flavor
- A sickening, burnt taste that kind of reminds you of singed cat hair or charred wood
Yuck is right. While you can certainly ditch your clearomizer and buy a new one, you also have the option of cleaning it to get a few more days or weeks of work out of the device. While some cleaning methods involve disassembling the entire clearomizer and rinsing out the wicks, a much easier method involves cleaning the tank and coils while leaving the rest of the clearomizer components intact. Here’s how.
[green_box]Thank you to Black Note for providing this article. Read my Black Note review or visit the website.[/green_box]
Revolutionary New Disposable Vape
The new Lost Mary MT15000 lasts up to 15,000 puffs and features the incredible new Pulse Mode that allows you to get double the vapor on demand. A front display shows the device's e-liquid supply and battery life at a glance. Try the Lost Mary MT15000 Sample Pack, which includes three different flavors, for just $39.99. Take an additional 20% off with the coupon code VAPEGRL.
Step 1: Clean the clearomizer tank.
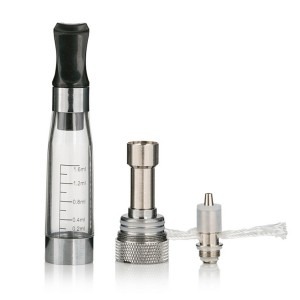 Remove the clearomizer tank from the battery, then open the tank the same way you would open it to refill it with vaping liquid. For some clearomizers this involves removing the top; for others, the bottom.
Dump out any remaining vaping liquid. Fill the tank about halfway with warm water, place your thumb over the opening, and shake the tank vigorously for several seconds.
Dump out the water and repeat until the water you dump is no longer dirty. Dry your tank as thoroughly as possible, shaking out moisture, toweling it down and blowing through it.
NOTE: If your tank is particularly filthy, you may want to insert a small brush, cotton swab or tightly rolled portion of paper towel to wipe out the interior. Make sure to get the little crevices around the top and bottom where gunky stuff can hide.
The new Lost Mary MT15000 lasts up to 15,000 puffs and features the incredible new Pulse Mode that allows you to get double the vapor on demand. A front display shows the device's e-liquid supply and battery life at a glance. Try the Lost Mary MT15000 Sample Pack, which includes three different flavors, for just $39.99. Take an additional 20% off with the coupon code VAPEGRL.
Revolutionary New Disposable Vape
Step 2: Dry burn the clearomizer’s coils.
The coils inside the atomizer are notorious for building up layers of gunk, ruining vapor production as well as the flavor. One way to get rid of the gunk is a method known as “dry burning.”
Attach your clearomizer to a manual battery that supplies power when you press the button. Press your battery button to heat the coil in short bursts, each burst lasting about two to three seconds. Wait a second or two between bursts to allow the heating element to cool down.
You’ll notice vapor coming off the coils as your wicks are drying out and the gunk is being burned away. Blow the vapor away from the coils, but be careful not to blow directly into the coils while you’re heating them.
The more vapor your clearomizer is producing, the more wetness and gunk is being burned away. Drying the clearomizer as thoroughly as possible before starting the dry burn can help speed up the process.
Keep up the dry burn process for several seconds, continuing to blow away the vapor, until the vapor production stops and your coils glow a brilliant orange. You can check on the coils by looking straight down the middle of your clearomizer from above, which gives you a bird’s eye view down into the coils.
Bright orange means the coils are gunk-free, at which time you can let them cool down and then give them one final blow to remove any remaining debris.
[red_box]NOTE: Cleaning a clearomizer by dry burning the coils only works if the clearomizer doesn’t have a cotton wick. A silica wick, for example, won’t burn — only the gunk on the coil will. A cotton wick will burn.[/red_box]
Step 3: Don’t forget the drip tip.
The drip tip is another component that can get gunked up and rather gross. Use a small portion of a rolled-up paper towel, toothpick, or cotton swab with part of the cotton pulled off.
Insert the item into the drip tip, rubbing it around the interior to remove any built-up gunk and debris. Repeat as needed, then give your drip tip one final rinse under warm water. Dry the exterior with a towel, the interior by blowing through it.
Step 4: Reassemble the clearomizer and start vaping.
Once your tank is cleaned out, your coils are dry burned and your drip tip is gleaming, you can refill your clearomizer with vaping liquid and once again enjoy your vaping experience.
Cleaning your clearomizer removes the gunk, but you can help prevent gunk from forming in the first place by choosing a high-quality vaping liquid. Cheap vaping liquids that contain tons of additives typically produce tons of gunk. A naturally extracted tobacco (NET) vaping liquid can cut down on the gunk factor dramatically.


0 Comments