

If you use sweet e-liquid, you already know that vape coils can get disgusting surprisingly fast.
One day the flavor is fine. The next day everything tastes a little off. Then, before long, you’re getting that dark, sticky, burnt-sugar mess that turns a perfectly good vape into something that tastes like it lost a fight with a dessert menu.
If you use refillable gear regularly, dirty vape coils are just part of life. The good news is that you can sometimes clean them well enough to get some extra use out of them. The less exciting news is that cleaning doesn’t perform miracles. A cleaned coil can absolutely be better than a filthy one, but it usually won’t taste exactly like a brand-new coil again.
So, let’s talk about how to clean vape coils, when it’s worth the effort, and when you should just stop being optimistic and replace the thing.
Recent Price Drop
The Geek Bar Pulse is just $16.99 after a recent price drop! Take an additional 20% off with the coupon code VAPEGRL. Shop Now.
What You Can Actually Expect From Cleaning Vape Coils
This is the most important thing to understand before you start.
Cleaning a dirty vape coil can remove a lot of the residue that builds up from sweetened e-liquid. If your coil tastes dull, dirty, overly sweet in a bad way, or vaguely like burned sugar, cleaning may help quite a bit.
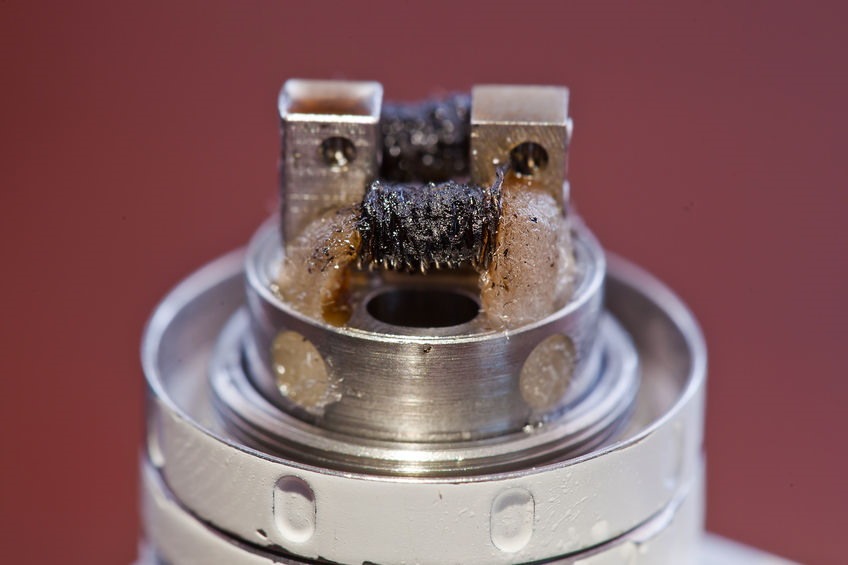
What cleaning won’t do is restore a coil to perfect factory-fresh condition. And it definitely won’t fix a wick that has been badly burnt.
If the cotton inside the coil has been scorched from a dry hit, that burnt taste may be there to stay. You can soak it, rinse it, stare at it encouragingly — none of that will un-burn the wick.
So the realistic goal here is not “make an old coil brand new again.” The goal is “get a little more life out of a coil that’s gunked up but not completely ruined.”
When Cleaning a Vape Coil Is Worth Trying
Cleaning is worth trying when:
- the coil is heavily gunked up
- the flavor has gone muddy or foul
- the wick doesn’t seem obviously burnt
- you want to squeeze a bit more life out of an expensive coil
Cleaning is probably not worth trying when:
- the wick is clearly burnt
- the coil still tastes awful after cleaning
- the coil is physically damaged
- it’s a cheap coil and your time is worth more than the rescue mission
That’s really the balance. Sometimes cleaning a coil is a smart little money-saving move. Sometimes it’s just delaying the inevitable.
The Easiest Way to Clean Vape Coils
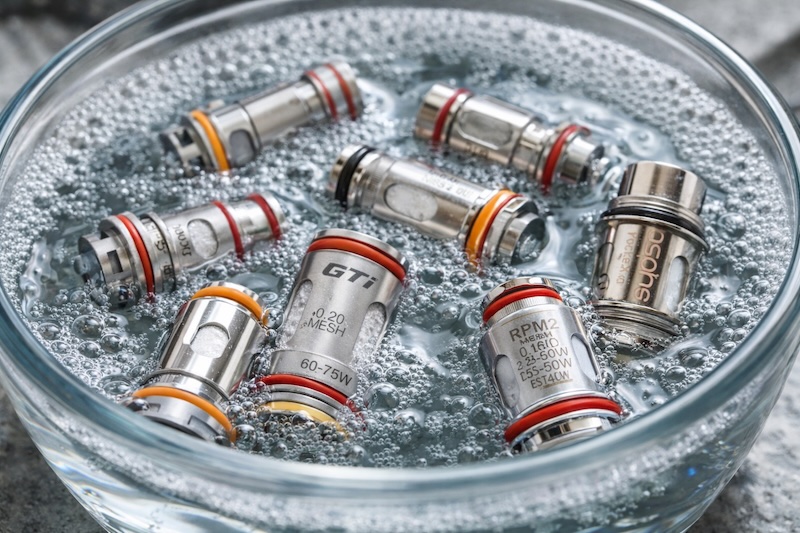
The simplest method is also the one most people can do immediately: soak the coil in hot water or high-proof drinking alcohol.
What You’ll Need:
- a dirty vape coil
- a bowl, cup, or glass
- hot water or high-proof drinking alcohol
- time
- patience, which vaping continues to require more often than seems fair
How to Do It
- Remove the coil from your tank or device.
- Drop it into hot water or alcohol.
- Swish it around a bit.
- Let it soak for several hours or overnight.
- Swish it again now and then if you think of it.
- Remove the coil and inspect it under good light.
- If it looks cleaner, let it dry thoroughly before using it again.
- If you used alcohol, rinse it well with water before drying.
Consider saving up a batch of dirty coils and cleaning them all at once. It can help you save time if you go through coils quickly.
Let the Coil Dry Completely
This part matters.
After cleaning, the coil needs to dry fully before you use it again. Not “mostly dry.” Not “probably fine.” Dry.
Once the coil is dry, prime it with e-liquid before using it again. If you skip priming and immediately hit the fire button like nothing happened, you may turn your freshly cleaned coil into a freshly ruined coil.
Using an Ultrasonic Cleaner
If you clean vape coils often, an ultrasonic cleaner can make the process easier and more effective.
That’s really the appeal: it does the shaking for you.
If you already own an ultrasonic cleaner, it can be a great way to clean multiple coils with less effort than repeated soaking and swishing by hand. It’s especially useful if you’re dealing with stubborn residue and want a more thorough clean than a simple soak can always provide.
Do you need one? No. Is it nice if you already have one or like the idea of cleaning coils in bulk? Absolutely.
Cleaning Vape Coils in Rebuildable Setups
If you use a rebuildable atomizer, cleaning gets much more appealing.
Why? Because you can remove the wick first. That’s a big deal.
With a rebuildable setup, the coil itself may still be perfectly usable even if the wick is shot. Clean the coil, install fresh cotton, and you may get a very respectable result without rebuilding from scratch.
You might even consider keeping two rebuildable atomizers so you can soak one while using the other.
Why Vape Coils Get So Dirty in the First Place
Sweetener residue is one of the biggest reasons coils get dark, crusty, and foul-tasting.
The more heavily sweetened the liquid, the more likely it is to leave deposits behind as the coil heats and cools over time. Add frequent vaping to the mix, and you’ve got a recipe for a coil that starts looking like it has seen things.
This is why some people find that certain e-liquids absolutely destroy coils while others are much easier on them. It’s not your imagination. Some liquids are just far more coil-hostile than others.
Can Cleaning Double the Life of a Vape Coil?
Sometimes, yes.
It varies depending on the coil, the liquid, and whether the wick is still in decent shape, it’s not an unreasonable goal.
You shouldn’t expect every cleaned coil to become a triumph. Some will come back nicely. Some will come back just well enough to justify the effort. Some will come back tasting like they resent you personally.
That’s normal.
When to Stop Cleaning and Just Replace the Coil
There comes a point where enough is enough.
Replace the coil if:
- the taste is still bad after cleaning
- the wick is burnt
- the draw or vapor production is still poor
- the coil looks damaged
- you are spending more time trying to rescue it than it would take to move on with your life
I believe strongly in thrift, but I also believe there is a limit to how much emotional energy any one vape coil deserves.
Final Thoughts
Cleaning vape coils can absolutely be worth doing, especially if you use sweet e-liquid and go through coils quickly. A good soak in hot water or alcohol may remove enough residue to give you a few extra days of decent performance, and an ultrasonic cleaner can make the whole process even easier. Rebuildable users have the biggest advantage of all, since they can remove the old wick and start fresh after cleaning.
Just keep your expectations realistic.
Cleaning can help with coil gunk. It can help with that nasty burned-sugar taste. It can save you some money. What it cannot do is undo a truly burnt wick or make every old coil taste brand new again.
So yes, clean your vape coils when it makes sense. Just don’t expect miracles from a piece of metal and cotton that has already been through a lot.

0 Comments