

The decision to begin building your own vape coils is a bit of an adventure. You’ll learn about electrical engineering, and you’ll use nothing but wire and cotton to build a real device that actually works. The even greater thing is that building vape coils isn’t even that hard; the vaping industry has produced an assortment of tools to make the process of coil building so user friendly that practically anyone can do it.
Revolutionary New Disposable Vape
The new Lost Mary MT15000 lasts up to 15,000 puffs and features the incredible new Pulse Mode that allows you to get double the vapor on demand. A front display shows the device's e-liquid supply and battery life at a glance. Try the Lost Mary MT15000 Sample Pack, which includes three different flavors, for just $39.99. Take an additional 20% off with the coupon code VAPEGRL.
As easy as coil building may be, though, it’s still important to remember that there is a certain amount of risk inherent in working with lithium-ion batteries because those batteries store more power than you may realize. If a vaping battery is shorted or overloaded – and it reaches a critical temperature condition called thermal runaway – it can trigger a terrible chemical fire that may result in severe property damage or injury. Fires relating to vaping are very rare compared to cigarette-related fires, but they do happen – and they’re easy to avoid if you just follow a few safety tips. Follow these basic safety principles every time you build a vape coil.
Know Your Battery’s Capabilities
Every battery has a maximum continuous load – expressed in milliamps (mA) – that it can safely deliver without overheating. Every battery also has a maximum charge capacity expressed in milliampere-hours (mAh). A battery with a higher capacity has a lower maximum continuous load. The reverse of that statement is also true.
Every battery marketed to vapers has its maximum safe continuous load printed clearly on the battery’s outer wrapper. However, the companies that sell vaping batteries are not actually the companies that make those batteries. Companies such as LG and Sony make the original battery cells. Other companies buy those cells, put wrappers on them and sell them – and here’s where the potential problems begin. Some companies egregiously overstate the capabilities of the batteries that they sell. Before buying any vaping battery, look for benchmark tests verifying that battery’s capabilities.
Get a Pair of Ceramic Tweezers
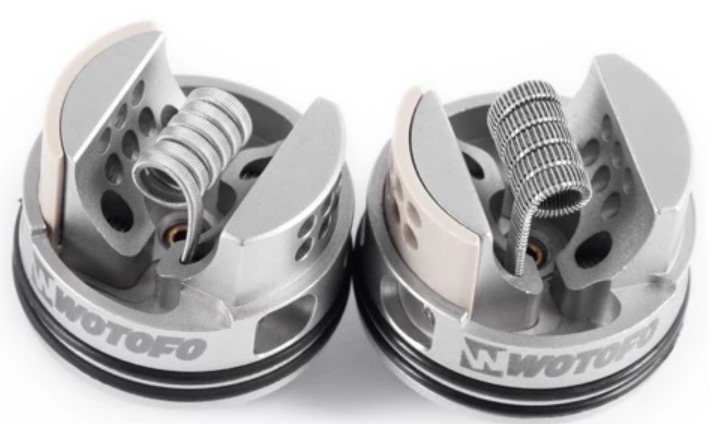
One of the best tools that you can add to your coil building arsenal is a pair of ceramic tweezers. Before you begin using any coil, you’ll need to fire the coil and check for hot spots (areas with uneven heating). If you find a hot spot, you’ll need to adjust the coil until it heats evenly. The coil will be very hot, so you can’t adjust it with your fingers. It’s also a bad idea to adjust a coil with metal tweezers because the tweezers may conduct electricity and heat. Ceramic tweezers don’t conduct electricity, and they insulate your hand from the heat of the coil. Ceramic tweezers also have very thin, rigid tips, so they’re perfect for adjusting small coils. The best part is that they’re very inexpensive – so don’t start building your own coils until you have a pair of ceramic tweezers.
Check a Coil’s Resistance Before Using It
A modern regulated mod can usually check the resistance of a coil for you. When you attach a new coil to a mod, it automatically displays the coil’s resistance. When you think about it, though, using your vape mod to test the resistance of a coil is effectively trusting your safety to a device powered by batteries that are potential fire risks. There’s a much better solution: get a standalone resistance tester.
There are several resistance testers on the market that are designed specifically for coil building. Those resistance testers actually double as coil building platforms. You place the resistance tester on a table, and you screw your RDA directly into it. The resistance tester holds the RDA in place while you build your coil. When you’re done building the coil, you flip a switch, and the meter tells you the coil’s resistance. A resistance tester can also warn you if the coil has a short. It’s the safest and best way to check the resistance of a coil.
Know How Many Amps Your Coil Will Draw
At this point, you know the resistance of your coil, and you know the capabilities of the battery you’ll be using to power the coil. The only thing that you need to know is how many amps the coil will draw from your battery. If the current is below the maximum safe discharge limit of your battery, the coil should be safe to use. Ohm’s Law describes the relationship between volts, ohms, amps and watts, and if you don’t happen to have that formula memorized, an Ohm’s Law calculator provides an easy solution. Just plug your coil’s resistance into the calculator, and you’ll see how many amps the coil will draw from your battery at a given wattage or voltage. If there’s plenty of headroom between the current that the coil will draw and the current that your battery can safely deliver, the coil should give you no problems.
Always Keep a Tank Handy as a Backup
Coil building is a lot of fun for those who enjoy DIY projects, but there are two things you should understand before you begin. The first is that you’re going to make some mistakes when you get started. You might build a coil with a short or a hot spot. You might deform a coil when you thread the cotton wick through it. In those cases, the best solution is usually to start over and build another coil. Mistakes made during coil building can be incredibly frustrating – and they’re even more frustrating if not having a working coil means that you can’t vape at all.
The second thing you should know is that there may be days when you really don’t feel like building a new coil. No matter how good you eventually become at building vape coils, it’s still an endeavor that’s going to take several minutes out of your day each time you sit down for a rebuild.
The best solution for both of the above problems is to ensure that you always have a backup solution around. Having a vape tank that’s always ready to go means that if things don’t go right with a rebuild – or you just don’t feel like building that day – you can always throw your tank on your mod and use that instead.


0 Comments